

Congratulations and welcome to the Outrider Pack! You have just received a world class Electric Adventure Vehicle (EAV) designed and manufactured by Outrider USA in the USA. We have designed and engineered the first EAVs in the world, and we refer to them as “Outriders.” You are getting ready to fall in love with a new way of riding and adventure unlike anything else. Below, we have outlined the key information to help you quickly transition from delivery to freedom on the open road or trail.
I. HELMET AND EYE PROTECTION - We start with this before you even begin to uncrate your Outrider because your safety comes first.
- OUTRIDER USA strongly advises that a helmet be worn, and properly secured, anytime you ride (even if your Outrider is not powered on).
- OUTRIDER USA strongly advises that proper eye protection be worn while operating your Outrider.
- OUTRIDER USA recommended riding age is 16+.
RECOMMENDED TOOLS (see “Tool List” on last page) - These are the tools we recommend to have in hand to properly maintain and make adjustments on your Outrider.
II. UNCRATING - Recommended tools for uncrating your Outrider: Electric drill with a philips head bit, scissors/utility knife or wire snips, 6mm allen wrench (included), 4mm allen wrench (included if your Outrider came with a headrest)
Cut the vinyl strapping securing the lid and crate to the pallet.
Remove lid.
With electric drill or phillips head screwdriver, remove screws from crossbeam supports and remove crate.
Carefully remove cardboard surrounding by lifting (with a friend) over your Outrider or cutting the cardboard on each end and letting the sides fall.
Take your snips, utility knife or scissors and very carefully remove any zip-ties used to secure accessories to your Outrider. (Do not cut zip ties securing the wheels to the pallet. This will be done in step V)
Unhook the utility bag strapped to your cargo rack for additional tools required in setting up your Outrider along with some other important information.
See the next step for installing the boom/pedals.
III. INSTALLING THE BOOM/PEDALS/CHAIN - To save you money in freight cost, we remove the boom and pedals to reduce shipping dimensions. Therefore, after you have uncrated your Outrider, you must install the boom and pedals before you can ride. Follow these steps:

Carefully orient the bottom of the boom shaft to the entrance of the boom shaft receiver. Be careful not to pull hard on the braided cord bundle attached to the electronics junction box. There will be just enough slack allowing you to maneuver the boom into place.
Insert the boom all of the way to the bottom of the shaft (you will adjust and tighten the bracket in step V).
If you have not already done so, cut the zip ties securing the chain to the boom
receiver(feel free to use the included latex gloves to keep chain oil off your hands in this step).
With a firm grip, pull on the chain to create a little slack and carefully align the chain along the teeth of the chain ring.
At this point, you can cut the zip ties securing the wheels to the pallet.
Remove the velcro straps that are securing the brakes, or if equipped with a parking brake system, push down on the lever to release the brakes. (Tip: If you did not add a parking brake system, use the enclosed velcro straps to secure your brakes when getting up or sitting down and keep them wrapped around the bars when riding- this is what we use for our parking brake system).
Roll your new Outrider off of the pallet and to a flat location where you can install the pedals/boom and make adjustments.
IV. ADJUSTING THE BOOM - This is the first step in setting boom length to proper riding position. We calibrate the chain length and boom setting to your height prior to shipping. However, everyone is made differently and this may require you to fine tune the settings to your riding preference.

Re-secure brakes and gently pull on the boom until you see the chalk mark we drew on the shaft designating a good starting point for setting the boom based on
your height. Align that mark with the opening in the boom shaft and tighten both bolts with the included 6mm Allen wrench (make sure bracket is flush with end of the shaft
before tightening as shown in this photo).
Have a seat and place your feet on the pedals. When the boom is adjusted correctly, you will have a slight bend in the knee at full extension of the leg. If you find that you’re overextended, slide the boom inward. If you’re under-extended, slide the boom outward. Re-tighten the bolts at proper setting or setting you prefer to ride comfortably.
Once you have your pedaling position set, we will now take a look at the chain tension. We adjust the length of the boom/chain based on rider height allowing for the chain tensioner to compensate for slack within a certain range. Take a look at your chain tensioner on the rear right side of your Outrider and see if it falls within the proper range as shown in the photos below.
If the the chain tension is too tight or has too much slack, adjust the boom back to where the tensioner is in the proper range.
Secure the sheathed communications cable to the boom and swing arm with the included velcro straps. The straps are already positioned in the proper place to attach the cord as shown in pictures below.
Move on to the next step of adjusting the seat to finalize your fit.

V.
ADJUSTING THE SEAT - The seat can be adjusted forward and back. The angle of the seat is also adjustable.
FORWARD or BACK: Locate the bolts just under the bottom of the seat on each side. With a 4mm allen wrench, loosen each bolt to slide the seat forward or back. When proper position is reached, tighten the bolts securely.
SEAT ANGLE: Locate the seat arms located behind the seat and on either side of the shock. With a 5mm allen wrench and a 10mm box/adjustable wrench, loosen the nut and remove the bolt on each side. The seat arms will slide up and down to multiple settings. Replace the bolt through each arm at the desired setting and secure each nut back on the bolt.
CARGO RACK: If extreme adjustments are made, you may notice that the cargo rack has come out of a level position. To adjust the cargo rack, locate the bolt about halfway up on the seat on each side where the forward support arm of the rack is tied into the seat. Loosen each bolt with a 4mm allen wrench. Once the rack is in a level position, re-tighten each bolt securely.

VI. INSTALLING LED VISIBILITY WHIP & HEADREST (if equipped) -
VISIBILITY WHIP: Locate the round quick connect bracket on the cargo rack with cotter pin/lanyard attached. Place the threaded end of the visibility whip into the
bracket and line up the holes. Place the cotter pin through the holes until it comes through the other side of the bracket and locked in place. Finally, locate the wiring connector under the cargo rack and connect it completely to the receiving connector on at the bottom of the visibility whip. HEADREST: We have loosened the adjusting bolts to position the headrest for shipping.
Rotate the headrest into a vertical position.
Push headrest down to proper height ensuring the guide bars fit in between the cargo rack and the back of the seat.
Once in preferred position, tighten bolts with a 4mm allen wrench.
HEADREST: We have loosened the adjusting bolts to position the headrest for shipping.
Rotate the headrest into a vertical position.
Push headrest down to proper height ensuring the guide bars fit in between the cargo rack and the back of the seat.
Once in preferred position, tighten bolts with a 4mm allen wrench.
VII. CONTROLS - All of the vehicle controls are intuitive and easy to learn. We recommend taking a few practice runs with the electric drive system in the “Disarmed Mode” before engaging the throttle in the “Armed Mode” (see how to arm
/disarm the electric drive system below)
 .
.
POWERING ON: Insert key (rider left side under seat and above left charge cap) into key-switch and turn 180 degrees. The EAV Digital Console will power on and you will see data on the screen. Accordingly, the headlight and LED Visibility Whip (if equipped) will power on as well.
EAV Digital Console: (Rectangular box located at the top of the boom with digital display). This console shares important information with the rider allowing you to accurately monitor speed, power output, and your battery’s state of charge.
Display Interaction: Simply toggle through the left and right
buttons to explore the different menus available. Our team has taken care to set the values associated with the variables in the “SETUP” and “ADVANCED SETUP” menus to the appropriate settings. OUTRIDER USA strongly discourages altering these settings in any way, in order to prevent damage to the vehicle and the rider.
Resetting Data: Press and hold the left button until the unit says “RESET”, then release the button. This should be done after every full charge. * Please see sections X and XI below for more information about your display.
Di2 GEAR INDICATOR: Located just under the EAV Digital Console, this module provides a digital readout indicating your gear (pedal and handcycle models only). The battery indicator will never show full or empty, but will hover somewhere in the middle since it is direct wired into the battery indicating a steady stream output. Also, the Di2 Gear Indicator will power down after 3 minutes, but powers on again when a new gear is selected (see below in subsection G for information on selecting gears when pedaling or handcycling).
THROTTLE: The twist grip accelerator is located on the left handle and is activated by a twist of the wrist. This allows you to add as much or as little electric assist as you desire. If the throttle is released, it will spring back to 0% power. Go ahead and twist/release the throttle to get a feel for how it works. At this stage, twisting the throttle will NOT engage the motor since you should NOT have armed the system at this point.
BRAKES: The vehicle uses differential braking. The left brake controls the left wheel, and the right brake controls the right wheel. Please note that these are not front/rear brake controls! When braking while turning, use less pressure on the inner wheel, as it has less traction due to weight transfer. Both brakes must be engaged equally for rapid stops. It is
possible to lift the rear end of the vehicle under very hard braking maneuvers.
STEERING: Steering is controlled by the vertical tiller handlebars. In order to turn left, gently pull back on the left bar, and gently push forward on the right bar. Steering adjustments should be minor and controlled in respect of the responsive steering character of these vehicles. Grip should remain very relaxed on the handlebars in order to have maximum control and comfort at high speed. Avoid the inclination to push and pull on the bars while pedaling aggressively. Make sure to lean your body toward the inside of a turn. Failure to do so can result in one of the front wheels lifting off the ground from the gravitational force of the turn. This may cause the trike to tip over, potentially damaging the trike and causing personal injury.
SHIFTING (Gears 1-11): Your Di2 gear shifter is located at the top of the right handlebar. The larger button on the left is for “gearing up” or taking you to the higher gears. The smaller button to the right is for “gearing down” or taking you to the lower gears. Remember to look at the gear indicator just under the EAV Digital Console if you want to know what gear you have engaged. (Note: with the advanced internally geared rear hub, you do not need to be pedaling to select a gear.)

HIGH/LOW RANGE: OUTRIDER USA designed this proprietary system for a “LOW range” and a “HIGH range” of torque delivered to the motor. LOW range should be engaged when starting and riding on steeper/varied terrain. HIGH range can be engaged when cruising on flats or gradual inclines (you must be in motion to engage HIGH range). To understand, it helps to imagine LOW range as gear 1-3 on your car and HIGH range as gear 4-5.
Locate the switches just to the right of the gear shifter buttons. The red button on the top is to arm/kill your Outrider. The blue button on the bottom is for switching between HIGH and LOW range.
Once you have armed your Outrider (see subsection I below), you will automatically be in LOW range as indicated by the blue light on the EAV Digital Console.
If you are moving at a speed and on terrain appropriate to engage the HIGH range, press the middle button. There will be a slight hesitation in the motor and the indicator light will change to green. You are now in HIGH range. (Note: you can switch to HIGH range at any speed as long as you are moving. See below for max speed to change back to LOW.)
To drop back to LOW range, you must be at or below the following speeds for your particular model:
- 13mph on Horizon Models
- 30mph on Alpha models
If you are in HIGH range and come to a stop for 3 seconds or more, LOW range will automatically engage. (Remember, it is best to be in LOW range to begin moving from a complete stop just as it is harder to engage forward motion in your car if you are in gear 4.)
Alpha models must be pedaled to 2 mph before throttle will engage. This is to protect your drive system since the Alpha is geared for more mid to high-end torque. It doesn’t take much to get rolling at 2 mph.
VIII. ARMING/DISARMING ELECTRIC DRIVE SYSTEM: As a safety feature, we install an Arm/Kill switch on each Outrider model. When you power on your Outrider, you will always be in “Kill Mode.” This is indicated by the red light on your EAV Digital Console.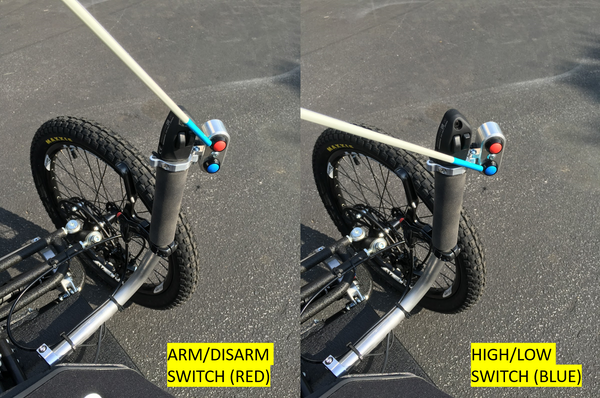
To Arm your Outrider, press the Arm/Kill switch (top switch). You will see the red light turn to blue and hear a chime from the motor indicating that you are now “powered on.”
To kill power to the motor for any reason/emergency, press the Arm/Kill switch. If you accidentally hit the kill switch while riding and then rearm by pressing again, you will hear a repeated chime from the motor because it has entered “diagnostic mode.” This does not indicate a problem, but is a feature to let you know the kill switch was activated while riding. When stopped simply turn off the key switch and turn back on to reset the system and eliminate the chime.
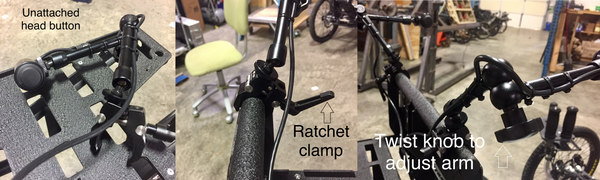
IX. HEAD CONTROLS FOR ADAPTIVE TRI-PIN OUTRIDER The arm/disarm, high/low range, and forward/reverse controls are all conveniently located and easy to use head buttons.
- SETTING UP HEAD CONTROLS
- When your Outrider arrives, the head controls will be in the seat, labeled with a “Left” and “Right.” Attach the Atom clamp to the top of the seat on the associated side with the “Impact” logo facing front. Using the ratchet clamp, tighten the camp into place.
- Once secured to the Outrider, you can adjust the position of the arm by loosening/tightening the twist knob. You want to make sure the buttons are oriented such that you can easily tap the buttons with the side of your head, but not so close that you could inadvertently hit them while riding.
- HEAD BUTTON CONTROLS
-
RIGHT BUTTON- ARM/DISARM When you turn on your Outrider, you will see a pulsing red LED light on the bottom left corner of the EAV digital display (section XI). When you hit the arm/disarm button on the right, you will hear a chirp and the LED light will change to blue. You are now armed in low range mode.
-
LEFT BUTTON- FORWARD/REVERSE To switch from forward to reverse mode, you will arm your Outrider following the instructions above, then wait at least 3 seconds then hit the left button. The blue LED will begin blinking red several times and then will be solid red. Your Outrider will now go in reverse. To return to forward mode, you must disengage the throttle for at least 3 seconds, then hit the left button. The LED will flash blue several times and then will be a solid blue. Once it is a solid blue, your Outrider is back in forward mode.
-
LEFT BUTTON- HIGH/LOW RANGE When you first arm your Outrider, it will be in low range, which will be indicated by a blue LED on the EAV digital console. This mode has a maximum speed of 13 mph and is ideal for climbing hills and riding on rough terrain. To switch to high range, you must be moving at ~3 mph and then will hit the right head button. The LED will change to a solid green color, indicating you are now in high range. The top speed for high range is 25 mph and is ideal for cruising on flat terrain. If you are ever idle for a few seconds in high range, the Outrider will automatically revert back to low range mode and the LED will change to blue. If you ever want to go back to low range mode from high range, you just hit the right button again and the LED will change back to blue, indicating you are in low range.
X. FIRST RIDE
Choose a smooth, paved, traffic-free area for your first ride.
Ride first under only pedal power, with the Electric Drive DISARMED, getting a feel for the steering, braking, and shifting, and making sure you have the pedaling boom/seat comfortably adjusted. Continue to ride under only pedal power until you’re comfortable with the dynamics of the vehicle.
When you are ready to engage the throttle, come to a complete stop and ARM the Electric Drive System as described above. Then, follow these recommendations based on the model you purchased:
Alpha (all configurations)- The Alpha is geared for more mid to top-end torque since it is designed primarily for road riding. You must pedal to at least 2 mph before gradually engaging the throttle. It has been programmed in such a manner that the throttle will not engage the motor until it has reached this threshold speed. The Alpha isn't happy starting from a complete stop, but likes to be rolling before engaging the throttle. Imagine trying to accelerate a manual transmission from a complete stop in 3rd gear. It's possible, but it is much smoother when already rolling.
Horizon (all configurations) - The Horizon is geared for more low-end torque since it is designed primarily for off-road riding with looser surfaces and steeper climbs. Therefore, the Horizon has the ability to start from a complete stop using the throttle only. We still highly recommend that you always engage the throttle gradually to improve the experience and protect your drive system.
Tri-Pin controls 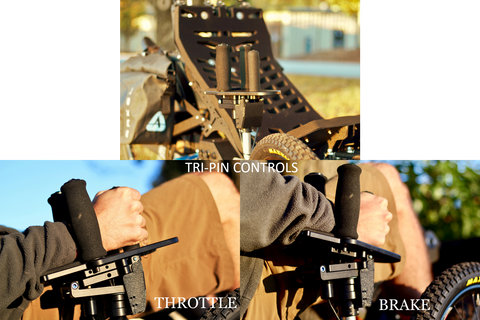
- The adaptive tri-pin controls can be set up with the throttle on either the left or right side, and can have independent right and left brakes or can have combined brakes on either the right or the left side.
- THROTTLE- To engage the throttle, you will drop your shoulder/elbow on the side with the throttle so that the plate tilts backwards at a slight angle
- BRAKE- To brake, you will push forward on either both sides or one side (depending on the orientation of the brakes) such that the plate shifts forward at a slight angle. It helps to slightly shift your hand up on the middle tri-pin when braking. If you have independent brakes, you will want to apply equal pressure on both brakes to stop. Do NOT engage the throttle and brakes at the same time.
- TURNING- To turn, you push and/or pull the handlebars depending on which way you would like to turn. It helps if your hand is all the way down on the middle tri-pin so that you will not inadvertently tilt the plate and engage the throttle or the brakes.
 If your Outrider is equipped with a Schlumpf High-Speed Drive (Standard on Alpha 4-Series, upgrade option on other models), read below:
When you want to be able to pedal at higher speeds, simply tap the button with your right heel and engage the Schlumpf high-speed gear which will more than double the gearing ratio.
When slowing to a stop make sure to disengage the Schlumpf high-speed gear by clicking it with the left heel, and downshift with the push-button shifter on your right hand. This way you will be able to pedal from a stop with ease.
IMPORTANT REMINDERS:
ALWAYS WEAR A HELMET!
Follow all traffic laws and use proper hand signals when on public roadways.
You control the throttle/speed - release the throttle and apply brakes.
Reduce speed prior to entering turns and to lean into the turns.
Avoid riding off-camber (side sloped areas) to prevent tipping.
When coming to a stop, go ahead and gear down (pedal and handcycle models only) to make it easier to get going again.
If your Outrider is equipped with a Schlumpf High-Speed Drive (Standard on Alpha 4-Series, upgrade option on other models), read below:
When you want to be able to pedal at higher speeds, simply tap the button with your right heel and engage the Schlumpf high-speed gear which will more than double the gearing ratio.
When slowing to a stop make sure to disengage the Schlumpf high-speed gear by clicking it with the left heel, and downshift with the push-button shifter on your right hand. This way you will be able to pedal from a stop with ease.
IMPORTANT REMINDERS:
ALWAYS WEAR A HELMET!
Follow all traffic laws and use proper hand signals when on public roadways.
You control the throttle/speed - release the throttle and apply brakes.
Reduce speed prior to entering turns and to lean into the turns.
Avoid riding off-camber (side sloped areas) to prevent tipping.
When coming to a stop, go ahead and gear down (pedal and handcycle models only) to make it easier to get going again.
Note: All Outrider EAVs are shipped in the Low power setting which complies with federal laws and to encourage a safe learning experience. We recommend your first several rides be taken in this setting until you have mastered the steering, pedaling(where applicable), braking and overall safe riding practices. It is your responsibility to know where you can legally ride in the higher power settings (refer to the section X below titled “Power Settings”). OUTRIDER USA accepts absolutely no responsibility for how you operate your Electric Adventure Vehicle (EAV/Outrider). You are encouraged to familiarize yourself with and ride according to the laws of where you plan to ride.
XI.
POWER SETTINGS - Please abstain from increasing the power output unless you are in an area that it is legally permissible. Doing so is only suggested for experienced riders with skill levels capable of safely operating the EAV in higher settings. When or where you have determined it is legal to move into the medium or high power mode, take the following steps to change the setting:
Disarm the Electric Drive System
Locate the EAV Digital Console which is the rectangle box located at the top of the boom that displays a digital read-out when the Outrider is powered on.
Locate the two side-by-side white buttons on the console under the digital display.
Press and hold the left button. At the same time, press and release the right button.
Continue pressing and releasing the right button as you see the display toggle through Low, Medium and High settings.
Release the left button once you have landed on the appropriate setting.
X. EAV DIGITAL CONSOLE (Menus and Numbers) - The left button is used to move left through the menus, and the right button is used to move right. Press and hold the right button to reset the data after a full recharge.
Menu 1 (Home menu):
- Top left: Pack voltage.
- 49.8V resting = full
- 38.0V resting = empty (shifting, headlight and visibility whip still functional, but motor will be inoperable until charged)
- Top right: Instantaneous speed.
- Bottom left: Instantaneous power consumption in kW.
- Bottom Right: Miles traveled / Amp-hours consumed/Motor Temp.
Menu 2 (Power menu):
- Top Left: Pack Voltage
- Top Right: Instantaneous power consumption in kW.
-
Bottom Left: Instantaneous amperage draw.
Bottom Right: Amp-hours consumed.
Menu 3 (Efficiency menu):
- Left: Watt-hours consumed (0= full)
- Right: Watt-hours per mile (This efficiency measurement allows you to calculate your projected total range based on your riding style.
Menu 4 (Regen): IGNORE
Menu 5 (Amperage menu):
-
Left: Max charging amperage
Middle: Max discharging amperage
- Right: Minimum voltage
Menu 6 (Speed menu):
- Left: Maximum speed
- Middle: Average speed
- Right: Ride time
Menu 7 (Lifetime menu):
- Left: Total cycles
- Middle: Total Amp hours used
- Right: Total miles traveled
Menu 8 (Long Term Energy Readout):
Battery resistance
- Reset cycles
- Lifetime energy consumption
Menu 9 (Diagnostics): IGNORE
XI. CHARGING
Remove both threaded charging caps to start charging. Located on the left and right side of the Outrider (Caps can be a little difficult to screw back on, be patient, you will get the hang of it)
The cap on the rider’s left has a failsafe trigger that is released when removed allowing the charger to begin charging the batteries. If this cap is not removed, the fan will run, but your batteries will not charge as another safety feature.
Full charge is 49.8 V and empty is 38.0 V. The battery icon on the EAV Digital Console IS NOT a good indicator or representation of voltage left on the battery.
When plugged in the fan will continually run, even when the batteries are fully charged. The Outrider will not overcharge. It is okay to leave plugged in.
Feel free to plug in and charge as much as you like. There is no need to draw down the battery to recharge.
Once to full charge or to desired charge level, unplug, place caps back on and tighten them all the way. Get your gear, put a helmet on and hit the road or dirt. You’re ready to ride!
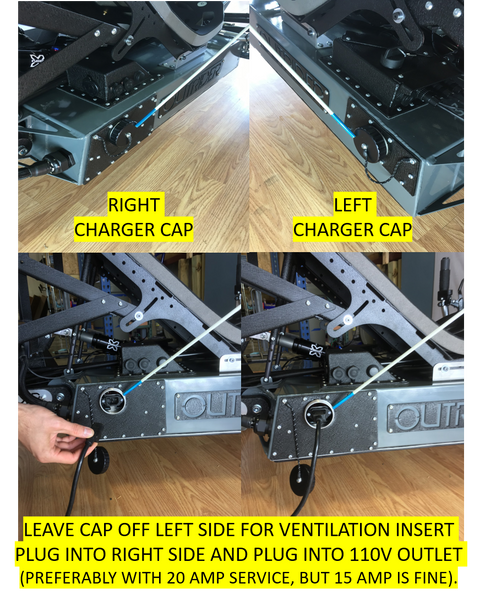
XII. SAFE CHARGING PRACTICES: Always remove BOTH Charge Caps! Only charge your Outrider in a dry, safe environment where it will not be disturbed. Do not attempt to charge your Outrider on anything but a standard 110V three-prong outlet. Charge in a fire-safe area. Don’t ever handle electronics or try to charge your Outrider when you’re wet, your Outrider is wet, or the environment around the Outrider is wet. Don’t do anything weird, uncommon, illogical, lacking common sense, or anything other than exactly following the steps outlined above.
When storing your Outrider for long periods of time, make sure it is in a location that will not reach sub-zero temperatures or extreme heat for extended periods.
The batteries will discharge slowly when left idle for long periods. To prevent the voltage from slowly dropping too close or below the safety threshold, it is good practice to bring it into a warmer or cooler environment (allowing the Outrider to adjust to room temperature) and charge it back up to full voltage. We recommend you do this approximately once a month during those months of little to no riding.
XIII. ADJUSTING SHOCKS - Your Outrider has front and rear air suspension, and that is AWESOME! The PSI, rebound and compression all depend on rider weight and preference. We have set your shocks to closely match your weight, but you may need to make adjustments based on the terrain you are riding and or preference. To do this, you will need a shock pump (not included). We can source one for you, but most bike shops stock these pumps or they can be sourced online. Use “mountain bike shock pump” for your internet query and select one that matches the manufacturer of your shock or choose the one you prefer (any manufacturer’s shock pump will work fine).
Front Shocks:
Unscrew valve cap on both front shocks.
Pump PSI on each shock to 85% of your body weight.
Place caps back on valves.
Rear Shock:
Unscrew valve cap on rear shock.
Pump PSI to 95% of your body weight.
Place cap back on valve.
Compression/Rebound (blue and red knobs):
The blue knob (compression) should be turned all the way towards the (-) sign.
The red knob (rebound) can be left in the middle between fast (wide open) and slow.
REMOVING/INSTALLING REAR WHEEL https://www.youtube.com/watch?v=hTGHX7WcuRA
CLEANING YOUR OUTRIDER - Your Outrider is well engineered for riding through rain, puddles, snow, shallow streams and mud. However, it is not designed to be submersed underwater. Therefore, when you go to wash your Outrider, do not pull out the pressure washer or a high-powered nozzle on your hose. We ride tough and clean gently!
-
Turn key into the off position and leave key in the switch. (The key shields the switch from moisture.)
- Make sure both charge caps are tightened securely and that all electrical all ports are covered (USB, power output, diagnostic ports..etc.).
Use brush to lightly remove loose dirt.
Use mild/biodegradable detergents and rinse with low pressure, spray bottle or use the “shower” setting on your nozzle.
Dry with microfiber towels.
Clean chain with rag and lubricate after each washing or ride through the rain.
Go for another long ride, get your Outrider dirty again and repeat!
OUTRIDER USA is not responsible for any reckless or illegal use of the EAVs we manufacture.
Questions?
Please feel free to call or email with additional questions or for clarification on anything detailed in this guide:
Phone: (828) 654-7555 M-F from 9am-5pm EST
Email: info@outriderusa.com
Please share your experience:
We encourage feedback on what can be done better and what was done well. We would also appreciate a review on our website to help those who may be interested to understand the experience of riding an Outrider and how it may have impacted your life.
Recommended Tools/Supplies for Outrider EAVs
Note: We use Park Tool brand primarily in our shop because they are high quality tools that match the quality of our Outriders. There are many other manufacturers of the tools mentioned below, so please feel free to shop and choose based on your preference/price range.
2, 2.5,3,4,5,6,8mm ball end allen wrenches
2 tire irons (Park Tool recommended)
6,7,8,10,11,13,15,17mm box end wrenches
Park Tool T20 Torx L-Handle
Park Tool pedal wrench
White lithium grease for pedals
Park Tool bottom bracket removal tool BBT-22
Park Tool crank bolt puller/extractor tool (Instructional Video)
Rock-N-Roll Gold chain lube (wet) and maybe want to source a PTFE (dry) lube for desert riding
Shock Pump by Rock Shock or similar from another manufacturer
Medium adjustable wrench
Park Tool master link pliers MLP-1.2
Park Tool chain tool ct-3.2
Extra zip ties are good to have
Extra tubes 20”
Latex gloves if messing with the chain
A shop rag or two
Toolbox to hold all of your tools!
** Many of the tools above are included in the Park Tools Professional Toolkit if you are interested in making an investment and having quality tools to work on your quality EAV.


